
Adjusting PVC Windows – How to Adjust a PVC Window?
Even the simplest single-sash windows, despite their appearance, are highly complex structures, containing dozens of moving components. High-quality windows purchased from a reputable manufacturer ensure a long lifespan—potentially lasting several decades. To ensure that a single-sash window meets your expectations, it is crucial to choose products that offer excellent thermal performance, durability, and security.
Even the simplest-looking single-sash windows are, despite their appearance, highly complex structures with potentially dozens of moving parts. However, to achieve long-lasting durability—potentially several decades—regular maintenance is essential. One key task is window adjustment, preparing them for the upcoming season: differently for summer and winter. This guide will teach you how to adjust your window for both winter and summer. Check if you can do it.
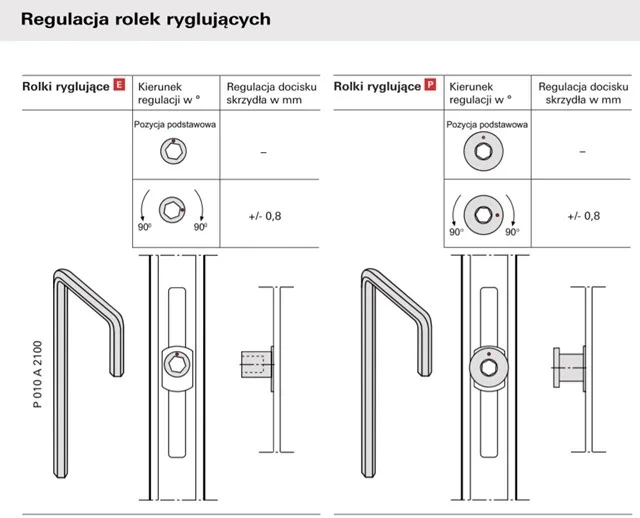
Adjustment of PVC windows involves three planes: sash pressure (mushroom cams (locking rollers), 4 mm Allen key), vertical (lower hinges), and horizontal (upper hinges). Basic pressure adjustment can be performed by anyone — it takes 2-3 minutes per window.
Why is window adjustment necessary?
Windows have a challenging task—they must ensure security while being constantly exposed to extreme weather conditions such as intense sunlight, frost, or moisture, which can lead to mechanism misalignment and reduced airtightness. A draughty window can also result from regular use (opening and closing). Window adjustment may be needed sooner than you think, as larger constructions tend to sag in the first months after installation. There is a high probability that the window sash has simply shifted, and adjusting it will save you the need to call for service or even replace the windows. Ignoring the problem may lead to cold air entering your home, causing heat loss, or worse, you may not be able to close the window at all.
When should you adjust the windows in your home?
Window adjustment is a task that should be repeated seasonally, regardless of whether you notice any issues with their operation or not. This regularity will ensure window tightness and prevent situations where heat loss in the home becomes noticeable and problematic. If you do not perform such maintenance before winter or summer, it is imperative to adjust them as soon as you realize your window won't close or is draughty. Ignoring the problem can lead to many unnecessary complications.
Is systematic window adjustment important?
Even if you think a draughty window is not your problem, window adjustment should be carried out at least twice a year. Winter window adjustment allows you to set the sash pressure to increase window tightness. Meanwhile, summer window adjustment will reduce the sash pressure against the frame to improve home ventilation, allowing more air inside.
Winter and summer window adjustment – how to increase or decrease window pressure?
Seasonal window pressure adjustment helps prevent cases where the sash sags or the structure becomes draughty. Winter temperatures can be harsh, and summer heat can be overwhelming—both situations can affect indoor thermal comfort. Adjusting PVC windows by properly setting the window hardware is a relatively simple task that can be done independently. This refers to perimeter hardware with mushroom cams (locking rollers). Correct adjustment will increase tightness in winter and improve ventilation and air circulation in summer.
Winter window adjustment
When it gets colder outside and you start wondering where the draught in your home is coming from, it's worth checking window tightness first. The winter mode for windows will help you save on heating. Winter window adjustment should start with checking the mushroom cams (locking rollers) in the sash. Your task will be to set them to increase window tightness, thereby limiting the inflow of cold air inside. The pressure of the window sash against the frame and their correct positioning are determined by window hardware. To increase the pressure, you must rotate the mushroom cams (locking rollers) so that they move closer to the seals. After the first adjustment, check if the window opens and closes smoothly. If difficulties arise, it means the sash is pressed too tightly and should be slightly moved away from the seals. Usually, after pressing the sash against the window frame, the handle starts to operate a bit more stiffly—this situation is entirely normal.
Summer window pressure adjustment
With the arrival of summer, it's worth conducting another adjustment of PVC window pressure to improve home ventilation and allow more fresh air inside. This time, proceed oppositely to winter window adjustment—reduce the sash pressure against the frame. Rotate each mushroom cam (locking roller) on the sash so it moves slightly away from the seals. Aim for an even setting on all cams around the perimeter.
How to recognise the right pressure? Use the paper test: close the window on a strip of paper placed between the sash and frame. If you can pull the paper out with very little resistance, increase the pressure slightly; if it tears or is very difficult to pull out, reduce the pressure. Avoid setting the pressure too low—excessively loose settings can lead to noise, draughts, and infiltration during wind or rain.
Adjusting window sash height
PVC window adjustment should be conducted not only based on the season but also when problems with opening occur, or when the window won't close. In the initial period of window use, they tend to sag. In such cases, minor adjustments to the sash position are necessary. The window hardware in the lower hinge is responsible for the correct height and positioning relative to the hinge axis.
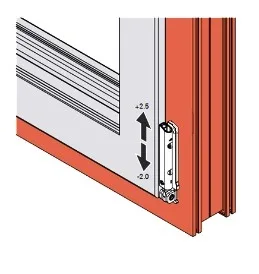
Vertical window adjustment involves setting them in the tilted position.
Step-by-step guide to self-adjusting PVC window height
Step 1 – Remove the hinge cover.
Step 2 – Tighten the visible top adjustment screw clockwise using a 4 mm Allen key. This will cause the window sash to rise.
Step 3 – Check if the window opens and closes smoothly.
Important! If any problems arise (depending on the need), you must slightly loosen the screws to the left or tighten them more to the right to achieve the desired adjustment.
Step 4 – Reattach the hinge cover.
To change the sash position diagonally, also adjust the hardware located at the top of the hinge.
Horizontal adjustment – step by step
Horizontal (lateral) adjustment corrects the sash position relative to the frame on the hinge side. This is done at the upper hinge.
Tool: 4 mm Allen key.
Screw: Lateral adjustment screw on the upper hinge (accessible after removing the hinge cover, if fitted).
Direction: Turn clockwise to move the sash towards the hinge side; turn counterclockwise to move it away from the hinge side (towards the handle side).
Steps:
1) Open the sash and, if necessary, remove the upper hinge cover to expose the lateral adjustment screw.
2) Insert the 4 mm Allen key and make small quarter-turn adjustments in the required direction.
3) Close the sash and check clearance and operation around the frame and seals; repeat in small increments until the gap is even and operation is smooth.
4) Refit the hinge cover.
Is self-adjusting windows worth it?
You now know how important PVC window adjustment is. In practice, it's not difficult, and if you have a knack for DIY, you can do it yourself. Importantly, with our guide, window adjustment will be done correctly. This ensures that window tightness adjustment is suited to the current season, thereby improving their functionality. If you want to enjoy smooth and trouble-free operation of your windows for many years, it's definitely worth adjusting them yourself seasonally!
Safety and warranty notice
Do not exceed the available adjustment ranges and do not dismantle load-bearing components. If a component appears damaged or seized, or if you are unsure about any step, stop and contact BUDVAR service. Incorrect adjustments may affect safety or warranty.